
At our administrative PLC meeting this week, we were given our new Chromebooks! Ours have a touch screen -- it's like a combination of a laptop and an iPad! Next year, our 7th through 10th graders will have 1:1 Chromebooks, so the staff was given the Chromebooks early to familiarize ourselves with them and plan for integrating them into lessons for next year.
.JPG)
Chromebooks run on their own operating system: Chrome OS. If you're familiar with using the Chrome browser, then using a Chromebook should be a fairly easy transition. Chromebooks have several advantages:
- fast start-up time (about 7-8 seconds!)
- long battery life (5-9 hours)
- outstanding virus protection
- Google Apps for Education built-in
- great for collaboration
- portability (access your files, bookmarks, apps, and extensions from any device by signing into your Google account)
- offline access (if necessary)
For those of you who are new to Chromebooks, here is some basic information to get you started on your Chromebook adventure:
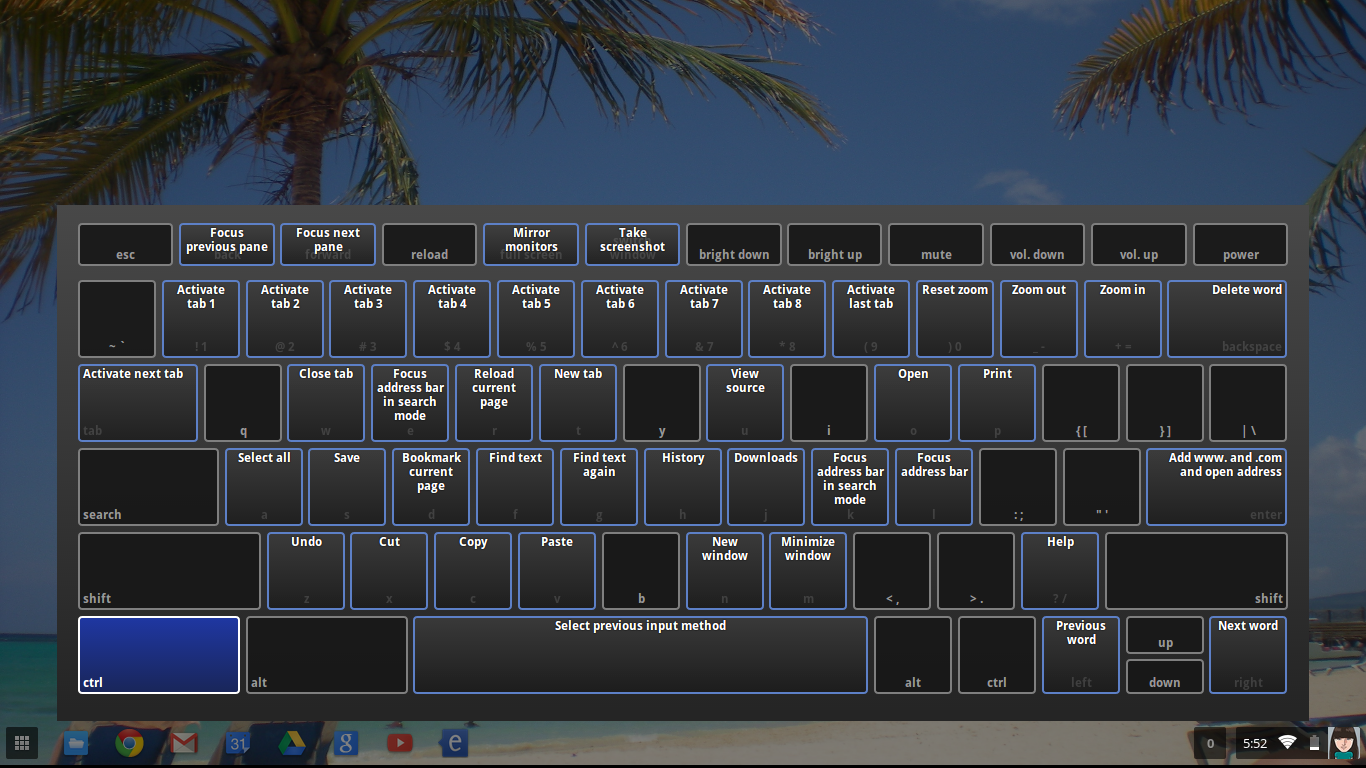 There are many keyboard shortcuts to make your life easier. If you hold down the ctrl + alt + ? keys, it will bring up a color-coded interactive keyboard display. Once in this display, if you hold down the either the ctrl, alt, shift, or search key it will highlight the keyboard shortcuts you can access with that key. (Note: there is no "caps lock" button on a Chromebook -- use the Alt + Search key (looks like a magnifying glass) instead. There also is no "delete" key -- use the "backspace" key instead.)
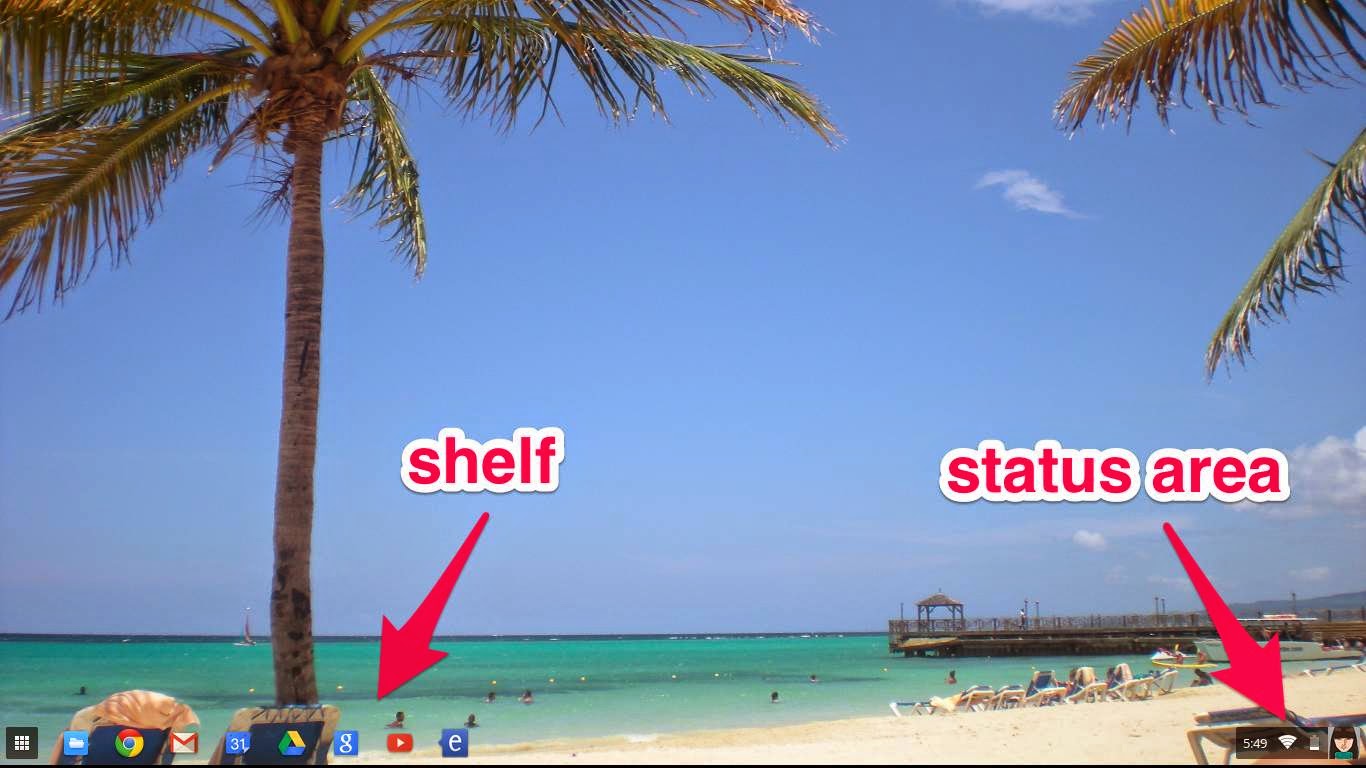.jpg)
On the desktop, you will have your "shelf" at the bottom left, and the "status area" on the bottom right. You can choose to keep your shelf hidden until you need it or keep it viewable all the time by tapping on the shelf area with two fingers (or alt + click) and either checking or unchecking the "Autohide shelf" option. (The shelf is basically the same thing as the "dock" on Apple devices.)
The shelf will have an icon for launching the apps list (3x3 little white boxes) and the Chrome browser. You can add any other apps you'd like by "pinning them" to the shelf. You can do this by first finding the app you want to pin in the apps list (click on the 3x3 little white boxes). Alt + click on the desired app and click on "Pin to shelf". Pinning an app to the shelf makes it quicker and easier to access.
The status area has important information about your Chromebook. Before you even click on the status area, you can see if you have any notifications, the time, wi-fi connection, battery life, and user icon. If you click on the status area you can see which user account is signed in, and sign out if you're ready to do that. You can manage your network connection, access bluetooth and volume controls, and access your settings. The date is displayed, and next to the date is a question mark to access the help menu. You can also shut down or lock your Chromebook from the bottom of the status area menu. If you lock your screen, you will be required to enter your account password to unlock it. You can have it require a password to wake it up from sleep mode for added security. You can also lock your screen by pressing the power key (on the top right) briefly until the sign in screen shows up. To shutdown your Chromebook, either hold down on the power key until it turns off, or click on shutdown in the status area.
 With Chromebooks you won't be able to access your old friends in the Microsoft Office Suite (Word, Excel, Power Point), but you will make new friends in Google Drive (Docs, Sheets, and Slides). The beauty of this is that you never have to pay for this productivity software and you don't have to worry about updates. This is all taken care of by Google in the cloud. And your files will be accessible from whatever device you use. In Drive, you can view a Word doc or convert it to Docs. (Warning: tables do not play well! They lose their formatting.) My advice would be to just store the Word doc in Drive and/or view it, but don't convert. Going forward, create all new documents in Docs.
 So, let's get back to the apps list (the 3x3 little white boxes). When you click on the apps list, you will see all the apps you have installed on your Chromebook from the Chrome Web Store. If you have more than 16 apps, you will need to use the scroll bars at the bottom to move to the next page of apps. You can rearrange apps or move them to a different page by dragging them to where you want them.
What's the difference between an app and an extension you ask? Well, an app is an application that runs in the browser (basically a website). An extension adds functionality to your browser. When you add an extension, you will usually see a small icon appear next to the address bar. Most extensions add their functionality to every website you use. Apps don't affect or interact with other apps. Some types of things extensions can do are blocking YouTube ads, the Google Dictionary which allows you to click on a word to have it defined and pronounced, creating QR codes or shortening the current URL, decluttering web pages to make them easier to read, text-to-speech, Gmail checker, split screen, or screen capture. There are so many apps and extensions to explore. Some are free and some you will need to purchase. Some are written by Google and some are written by independent developers. So go to the Chrome Web Store and do some shopping!
I hope this has helped you become a little more familiar with your new Chromebook. Be sure to check out the other topics that my fellow bloggers have written my clicking on their buttons below.