Sunday, March 30, 2014

Google Calendar for Apple iCal Lovers

If you read my last post about my first impressions of Gmail (I hope you did!), you know that I was a much bigger fan of my Apple mail than I was of Gmail, to say the least. Well, that goes for my Apple iCal app as well. I love the way I can keep all of my personal and professional calendar entries in one place. When my district went to Google Apps for Education and began sharing Google Calendars with us, I resisted. It was just another calendar, and I wanted to stick to my one and only iCal.

Thanks to our "Teacher Training Bootcamp", I have learned about the enormous number of useful features that Google Calendar has that makes my old iCal look like an amateur! 

I really like some of the features that allow Gmail and Google Calendar to work together. If I get an IEP meeting request, it can instantly be scheduled on my calendar, multiple reminders (email, text, and a pop-up) set so I don't forget to attend, and I can make sure I remember to write the IEP by adding it to my task list. Good old iCal couldn't do all that! So I really wanted to utilize Google Calendar for work, but didn't want to deal with my schedules in two places, Google Calendar for work and iCal for my personal life.

As I was learning all about Google Calendar in my quest to get Google Certified, I discovered how to transfer all my iCal calendar entries to my new Google Calendars. Now I could manage all parts of my life in one place with so much more functionality -- a dream come true!

To transfer all of your iCal entries, open your calendar on your Mac. Highlight the calendar you want to export. On the top left menu, choose File > Export > Export.


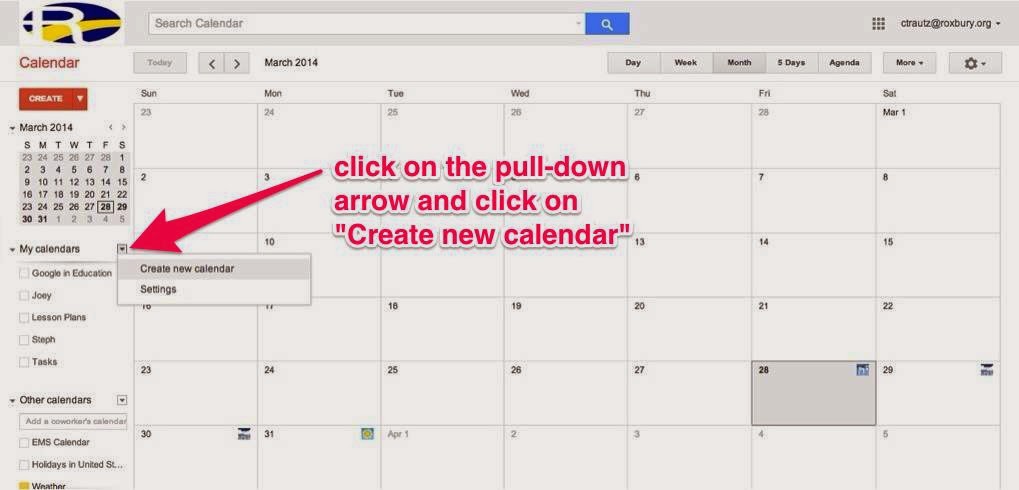
Go to your Google Calendar. Click on the pull-down arrow to the right of "My Calendars" and click "Create new calendar". 


Then go down and click on the pull-down arrow to the right of "Other Calendars" and click on "Import calendar".


In the pop-up window, click on "Choose File" and select the calendar you exported from iCal (.ics file). Then click on the pull down below to choose the new calendar you created to import into. Then click on "Import" at the bottom to complete the process. Repeat this process for each iCal you want to import into Google Calendar.


Congratulations, you now have your iCal events in your Google Calendar! 


Wednesday, March 26, 2014

Lesson Learned

If you read my last post, you know my students were in the middle of a cool app-smashing project involving Desmos, Skitch, and Showbie. At the end of class, they saved their work to the camera roll to finish up the next day.

In our building, we have three iPad carts with 30 iPads each. The iPads are numbered in the settings, and at one time they had numbers on the lock screen and home screen. Unfortunately, many students feel the need to change the photos on the screens, making it difficult to quickly and easily identify the iPad. Also, when students are done using the iPads, they don't get returned to the correct slot in the cart either, so it's like finding a needle in a hay stack to find the exact iPad you need. I always remind my students to check the number in settings and record it on the sign out sheet in case we need to use the same one the next day (as in this case). Some did, others didn't. 

Our wonderful technology teacher Ruth Davis just happened to be in my classroom at the start of class because she was bringing the iPad cart to me. She and I spent a good 10 to 15 minutes going through all the iPads trying to find the iPad that each student had saved their work on the day before. It was a disaster! I finally gave up and scrapped the idea of finishing the project.

Lesson learned: don't save work to the device, save it to the cloud!


The project was supposed to include the student saving their completed project to Showbie. I had lost track of time towards the end of class and in my haste, I told them to just save it to the camera roll instead of signing into Showbie and adding it to today's assignment folder. I will never do that again. Showbie is such a great app, and every project we have ever done could be saved to Showbie for safe keeping. Then it wouldn't matter which iPad, or which cart for that matter, the student ended up with the next day -- they would always have access to their work. Lesson learned.

Monday, March 24, 2014

App-smashing with Desmos

Click on the image above to open the PDF
On Friday, we learned the basics of slope - how to find slope from a table or a graph. Today, I wanted to reinforce the concepts and help them make the connection between the table and the graph, so I designed an app-smashing activity for my students using Desmos, Skitch, and Showbie

First, I walked the class through completing the worksheet (see left). They were basically picking random numbers to help them build their own personalized input-output table. Their choices for boxes A and B became their first ordered pair. Then their choice for C and E became their rate of change for the x-coordinates, and their choices for D and F became their rate of change for the y-coordinates. They completed their input-output table and found the slope. They then completed the same thing on the opposite side of the worksheet so they had two input-output tables to work with. The only stipulation I gave them was that if they chose the same signs for E and F on one side, they had to choose different signs for the other side (so they ended up with one positive slope and one negative slope).


Next, they opened up Desmos and I walked them through how to recreate their two tables that they had just created on paper. I had them change the graph to be a connected line with points instead of the default of just the points being displayed. They needed to make sure the axes were labeled in increments of 5 so it was easier to count the rise and run. When both tables were set up, they took a screen shot to save it to the camera roll.

The next step was to open up Skitch, import the screen shot, and label the following things: the change in the x and y values in the tables, the rise and run of each line, the slope of each line, and whether the slope is positive or negative. I asked them to color code the labeling so the color they used for the table and the line matched.Then they tapped share and saved the image to the camera roll again.

The final step was to go into Showbie, open today's assignment, and tap the + sign at the top right to add the photo from the Photo Library. They just had to tap done, and it was submitted to me.

It sounds like a lot of steps, but everyone did well with the process. A few students actually finished the whole project by the very end of class. Most of them will finish it up in the first few minutes of class tomorrow. They really liked working with Desmos, so I will be definitely planning some other app-tivities with it in the future.


Sunday, March 16, 2014

First Impressions of Gmail

First impressions aren’t always accurate...

I have to admit, I wasn't a big fan of Gmail at first. When my district first started using Gmail, I didn’t like it, I didn’t want to use it, I wanted nothing to do with it. That’s because I didn’t know enough about it. I didn’t want to stop using my Apple mail app, which I had grown very attached to.

I’m so glad I decided to take part in this journey with my fellow educators to become Google certified. I’ve learned so much already and it’s only our first topic! I feel much more confident with Gmail and actually really like it more than my Apple mail now!

I think I'm label crazy! I love using labels to categorize my email and appreciate the fact that I can use more than one label for each email. I also find being able to use filters to automatically handle any incoming email a real time saver.

Right now my favorite feature of Gmail is the task list. So many times I have forgotten to add a task to my to do list after I read an email. Now I can do it as soon as I read the email. And I love being able to cross off completed tasks - makes me feel so productive!

With all of Gmail's features, it's like having a personal assistant. I just switched over my personal email from Yahoo to Gmail so I can take advantage of all Google has to offer me in my personal life too.

Earlier this week, a colleague asked me to help her with a problem she was having with her Gmail account. If she had asked me that same question a week ago, I would not have been able to help her. But thanks to all I have learned from the Gmail training, I actually could help her! We were both thrilled!!

So, if you're not already using Gmail, you should give it a try. And if you are already using Gmail, keep reading through all of our posts to learn how you can utilize Gmail to its fullest. Follow our blogs over the next several weeks to learn about great features of all the other Google apps too!


Saturday, March 15, 2014

Google Certification

I normally only blog about the experiences I have with technology in my classroom. But for the next several weeks, I will be joining a great group of educators around the country in blogging about our experiences in our quest for Google certification. We will be contributing to a blog series entitled "Teacher Training Bootcamp" as we journey through the training sessions for our Google certification. We will share the tips and tools we discover that will help you in your classrooms. Here's the schedule:

      • March 16 - Gmail
      • March 30 - Calendar
      • April 13 - Drive
      • April 27 - Sites
      • May 11 - Misc. electives

Check out this YouTube video preview of our endeavor, created by our organizer Jennifer Kimbrell: http://youtu.be/AEVe0EZtkMs

So join us for our bi-weekly link-up and find out how to use Google to make your life easier and more organized!

Saturday, February 22, 2014

BINGO!

Everyone loves a good game of old-fashioned Bingo, right? But those chips all over the floor at the end of the day -- not so good. Enter the iPad and BingoBaker!


This is a great activity to use when you have quick-to-solve problems, not long multi-step problems. We were working on simplifying expressions with square roots, so this was a perfect skill to practice with a bingo game.

Setting the game board up is easy -- go to www.bingobaker.com. You can use the site even if you don't sign up for an account, but if you do, you can save your games and, if needed, print more than 8 paper copies. The cost for an account is a one-time fee of only $9.95. 

Enter what you want to show up in your 24 boxes and click Generate at the bottom. The next screen will give you a link to play your bingo game online. I create a QR code for the link so my students just need to scan the code to get to their bingo board. The great thing about this is every student's board will be different! BingoBaker randomizes the board every time someone else accesses it. (If you print the boards, it will do the same thing.) Instead of placing a chip on a box, they simply tap on it and it changes to a yellowy-orange color. (The first time you play this with your class, let them "play" with the board first, making patterns, etc, to get it out of their system!) If they tap on a box by mistake, simply tap it again and it goes back to white.

Almost forgot to mention -- even if you don't have a class set of iPads, this also works great on smart phones. This is actually how I did it the very first time I used BingoBaker. I told the class to bring their own devices, but for those who did not have any to bring, I was able to print out the bingo boards on paper for them.

Although I use BingoBaker for math problems, I can see it being used for practice with vocabulary in any content area, learning capitals, chemistry symbols, foreign language, or just about anything. I put the problems up on the SmartBoard so it's easy to flip through the slides quickly. You could also have some type of photograph up on the SmartBoard that they have to identify it and find the name of it on their bingo board. The possibilities are endless!

The class loved this fast-paced game (they don't even realize they're doing all those math problems!) We were running out of time at the end of class and they all begged me for just one more problem!!

Saturday, February 15, 2014

Thank you, PLN!

How did I get started in Twitter and growing my PLN? That's a question I asked myself recently. I had to think for a few minutes about my first experience with Twitter, and what (or who) made me decide to give it a try. I guess I'd have to credit @ipadsammy (Jon Samuelson) for getting me started. I'm not sure if he'll even remember this, but back in December 2012 he encouraged me to start a Twitter account and following other educators across the country. I'm still not quite sure how I even found Jon. It's kind of like "what came first, the chicken or the egg?". I started following him around the same time that I discovered @mathycathy's (Cathy Yenca) blog, and I'm not quite sure whether I found her blog because of Jon, or I found Jon because of her blog. But either way, they were my original inspirations. (Thank you so much to both of you!!)

At first, I just Twitter-stalked. It took me a long time to feel like I had something to say that others might think of as interesting enough to read. I just absorbed anything and everything I could about using iPads in my math class. After an almost full year of utilizing these wonderful tools in my classroom, I finally decided I wanted to begin blogging about some of my experiences so I could possibly help others, as everyone in my PLN did for me.

With that said, here's a list of those in my PLN that I feel have really been the biggest inspirations for me in either iPadding and/or blogging. Most of you probably don't even know me, but you have made a difference in my work, so thank you!


  • Jon Samuelson, Alison Anderson (@tedrosececi), and Curt Rees (@CurtRees) - I learned so much from your Techlandia podcast, not to mention had a lot of laughs!
  • Cathy Yenca - the fact that you blogged about your first experiences with iPads and you teach middle school math like me has been a huge plus!
  • Lisa Johnson (@TechChef4u) - so many great ideas from your blog, you're so creative!
  • Fawn Nguyen (@fawnpnguyen) - love your stories and your attitude!
  • Aimee Bartis (@aimeegbartis) - thanks for the advice!
  • Tony Vincent (@tonyvincent) - thanks for sharing my Stick Around puzzle on your blog!
  • Jenny Magiera (@MsMagiera), Sue Gorman (@sjgorman), Jeff Herb (@InstTechTalk), and Jeff Bradbury (@TeacherCast) - love your podcasts too!
  • Rafranz Davis (@RafranzDavis), Andrew Stadel (@mr_stadel), and Julie Reulbach (@jreulbach), - fellow math techies with great blogs!
  • Jen Kimbrell (@TechwithJen) - great ideas from the Technology Tailgate crew!
  • Terri Eichholz (@terrieichholz) - you engage my mind!
  • Erin Klein (@KleinErin), Drew Minock (@TechMinock), Brad Waid (@Techbradwaid) and Courtney Pepe (@ipadqueen2012) - great AR ideas!
  • Emre Firat (@EMREFIRAT2012) - thanks for the Google assistance!
  • and to everyone else I failed to mention, thank you too!