Tuesday, November 18, 2014

I get a kick out of Classkick!

Last week I tried the Classkick app for the first time. It was so much fun to use with my students that I felt I had to share it with everyone!

Classkick allows me to create my own assignments and share them with my students via a class code.  Creating assignments is so easy.  I can write 10 problems in Classkick in much less time than it takes me to type them up and make sure all the formatting of my document looks just right.  You can also import images from your camera roll, including screenshots of documents.  

Students use a stylus or their fingers to write the answers to the problems, or they may type text as well.  One thing they appreciated is that they aren't limited to writing in just one screen and can scroll down if they need extra space to solve their equations.

The really cool part is that I can see every problem of every student in real time on my iPad!  I can see their progress, and I can select a specific problem to view.  I can add comments or provide help by writing on their problem right along with them.

If a student needs my help, they can tap on the hand icon (like raising a virtual hand) and I see the indicator on my iPad that they need my help, and for which problem they need my help with.  I'm not one to sit at my desk, but I theoretically could help every student from the comfort of my chair.

As I am checking through their work, if I notice an error, I can send them a message like "check #3".  If I see a student daydreaming or goofing around, I can send a message like "please focus". 

Teacher view
Student view

Another plus is that I don't have to stand in line at the copy machine and I'm saving some trees too!  I had so much fun using Classkick with my students, and they seemed to like it too.  I've used it three times so far, and when I asked them to go to Classkick, I actually heard a few of them say "Yay!"

Saturday, October 25, 2014

Problem Solving in the Classroom with CueThink: #makemathsocial

Solving word problems is one of the most difficult concepts to teach math students.  Just mention the phrase “word problem” and students moan and groan and run for cover!  Yet, students need to be able to communicate their problem solving metacognition so teachers can actually ‘know what they know’.  And the Common Core Standards are asking them to be able to do more high level thinking and communicating about math, not just answer multiple choice questions.  As teachers, we need a better method for teaching this concept, and a way to make it more engaging for students at the same time.  


Scaffolds for student learning


Hungarian-born mathematician George Pólya is famous for documenting his four phases of problem solving.  CueThink has used Pólya’s phases to build an app that scaffolds students through the problem solving process.  Here’s an overview of Pólya’s four phases and how they connect to CueThink’s phases:


Pólya’s phase
What it means
CueThink’s phase
Understand the problem
In order to solve a problem, you must first understand what is being asked.  You need to know what all the vocabulary terms used in the problems mean.  You should be able to restate the problem in your own words if you truly understand it.  You should identify what information is important and what is not needed.  At this stage, you should try to estimate what a reasonable answer would be.  You should try to visualize a picture or diagram that could help you solve the problem.
UNDERSTAND
Devising a plan
This is where you chose a problem solving strategy.  Some of the most common and useful strategies are:
  • draw a picture or diagram
  • make a table
  • solve an easier problem
  • work backwards
  • guess and check
  • make an organized list
  • act out or model with manipulatives
  • write and solve an equation
  • look for a pattern
PLAN
Carrying out the plan
Use the strategy you have chosen to solve the problem. Persist in finding a solution.  If it is not working, go back and choose another strategy.
SOLVE
Looking back
Reflect on your solution.  Is the answer reasonable?  Did you show all of your work clearly and explain your solution so someone else can understand it?
REVIEW


Modeling for my students


I began my adventure with CueThink by working through a problem as a whole class discussion (see screenshot of the PLAN phase below).  I wanted to model how to use the app properly and not just have them jump in and do any old thing with it.  I reflected my iPad onto the SmartBoard so my students could see exactly what I was doing.  The students used scrap paper to come up with their own solutions, and after I had checked them and we discussed all of their solutions (some good and others needing some refinement), I modeled how to use CueThink to enter our information and then recorded our solution.  My classes have used the Explain Everything app several times so they are familiar with how screencasting works and how to use the tools provided, so using CueThink’s Solve phase should be a very easy transition for them.

IMG_2123.PNG


Future plans


For my students, I should have first reviewed Pólya’s four phases of problem solving with my class so they could make the connection between them and CueThink’s phases.  I plan on doing this before the first time I actually let them all use CueThink independently.  I am also planning on introducing my classes to some of the more common problem solving strategies (see table above).  Initially, I will pick one to focus on at each CueThink session.  I will scaffold their learning of the different strategies by first telling them which strategy we are going to be practicing on that day, and eventually get to the point where, after they have identified and practiced the most common strategies, I will then give them a problem to solve and let them decide for themselves which strategy they want to use.  I also want to make sure they know that there can be more than one strategy that they can use to solve a problem.  Hopefully, some of them will use different strategies so we can explore and discuss each of them.  The CueThink gallery is where they can go to view all of their classmates’ thinklets.  After seeing other strategies for solving the problem, they can even go back and edit their original thinklet, revising just the portions of it they’d like to change, instead of starting from scratch (technology rocks!).


#makemathsocial


As for the social aspect of CueThink, I think this is where my students will be super engaged in using the app.  When my students use CueThink independently for the first time, I will just have them focus on creating their “thinklet”.  This may take longer as they are getting familiar with the phases, options, and tools that the app provides.  The second time they use CueThink, I will introduce annotations.  I will model this up on the SmartBoard before turning it over to them.  We will have a brainstorming session to create a list of appropriate and inappropriate comments and feedback to give to another student's thinklet.  I might even leave a list of sentence starters hanging up in the classroom for the next few CueThink sessions as a reminder for them to check before posting their annotations.


I feel that giving my students the background knowledge of what good problem solving looks like will improve their work.  Stay tuned -- I will update you as this adventure unfolds and my students and I #makemathsocial!


(I recently started working with the great team at CueThink as an Implementation Specialist. Check out this demo video to learn more about CueThink!)


Join my fellow bloggers Mondays for "Don't Worry... Be Appy Monday":


Tuesday, September 23, 2014

Flipped Classroom without the Flip

(This is an update to my July 23, 2014 post "Fraction Review with ThingLink".)

Fractions is one of those concepts that my students always struggle with.  It's not something I should be teaching according to the eighth grade common core curriculum, but it's a skill they really need for some of the other topics this year.  In the past, I have spent way too much time reviewing fractions (like a whole month!), so this year I decided to take just one week and have the students use my "Know Your Fractions" ThingLink for an independent self-paced review.  It's sort of a flipped classroom model without the actual flip -- they weren't watching videos at home and coming to school to practice and apply what they learned.  Instead, in class everyday they watched the video(s), completed practice problems, and took one or two ThatQuizzes.  Some of my students were able to complete the classwork without any help from me, but for those who needed me, I had more time to devote to helping them than if I had been teaching a whole group lesson. 


This concept of self-paced learning worked so well with my classes!  The students were all very engaged in the lessons, did well with the practice problems, and the classroom management was a breeze!  They all knew the routine and moved from one activity to the next with minimal direction from me.  Some of them even went back and watched the video again if they were having trouble before they asked me for help.  The class completed a section per day, with the exception of "Fraction Operations".  I actually split up that section into two days, one for adding and subtracting, and the next for multiplying and dividing.  Each day there were a few students who finished the classwork early, so I had some additional activities for them.  

I will definitely use this again next year, with a few tweaks.  I did not have a review of simplifying fractions, which all of my students could really use.  I actually took a day off last week from my ThingLink lessons to review simplifying fractions before they moved on to the next topic in the ThingLink.  I will be adding simplifying to the first section of my ThingLink which is currently just "Equivalent Fractions".  I will also be switching the "Mixed Numbers" section and the "Fraction Operations" sections so that students will be able to write their answers to the operations problems in mixed number format instead of leaving them as improper fractions.  I don't know why I didn't think of these things when I created this, but we learn from our mistakes, right?

Even though this went super well, I would not use this style of instruction all the time.  It was perfect for these review lessons, but as for teaching a new concept, I really prefer the more traditional lesson for my special education students.  When I asked them what they thought of learning like this, they all said they liked it, but I miss the interaction with them and the class discussions we have in my usual style of teaching.  

Another added benefit of this flipped-but-not-really-flipped style is that I was out sick on the last day of the fraction review, but the lessons went on as planned without a hitch.  I wonder if they even knew I wasn't there??? 

Saturday, September 6, 2014

2 birds...1 stone

For the first few days of school this year, I tried to "kill 2 birds with 1 stone" so to speak.  First days are usually for going over classroom rules and teacher expectations, and most teachers conduct some sort of icebreaker activity for everyone to get to know each other.  This year my goal was not only to do these standard activities, but to use this opportunity to introduce and familiarize my students with some of the technology we will be using throughout the year.

Day 1 goals:  
  • explain my rules and expectations
  • introduce Nearpod

Day 1 activities:

My students participated in a Nearpod presentation in order to become familiar with the format of Nearpod and the various types of interactive activities that can be included in a NPP.  The first several sides displayed the same information that in the past I had presented with PowerPoint, such as my contact information, how much I LOVE math and hope they will too by the end of the year, supplies they will need, an overview of my teaching methods and classroom routines, and my favorite quote:

Created with quozio.com

Then I had a slide which instructed them to put in their earbuds and watch the following video, reminding them to pay close attention because there would be a quiz afterwards.  (I purchased a class set of cheap earbuds at the dollar store so every student will have them whenever they need them. They are all in ziplock bags labeled with each student's name and do not leave the classoom.)  They all seemed engaged in the video (which I created last year with VideoScribe).

Screenshot of the final frame of my video


When everyone was done, the quiz began!  I created a question to go along with each of the nine expectations that had just learned about.  Some of the questions were fill-in-the-blank, some were multiple choice, and others were draw-its.  My hope is that when we do our next NPP for a content topic, I won't have to go through explaining how Nearpod works because they should all already be familiar with it and this will save some class time. 

multiple choice question in Nearpod


Day 2 goals:


Day 2 activities:

For the second day of school, I had the students interview their partner and then create an Explain Everything video about their partner.  I did this same activity last year and you can read my blog post about it here for more details.  The only thing I changed this year was the order of the activities.  This year I started by showing them the video I made about my partner (my roommate Mr. Basso).  Then I had them interview each other.  When all the interviewing was complete, I had them follow along with me in Explain Everything as I demonstrated what each tool did.  I gave them a few minutes to try each tool before introducing the next one.  This allowed them to become comfortable with the app before they had to use it to create their video.  Once I felt they were ready, I explained how I wanted the final product to be organized (I had them answer 2 of the interview questions per slide, with a total of 5 slides altogether in their video).  Then they all went to work.  Most students only completed 2 of the 5 slides, so we will be completing the videos on Monday.  But the next time I ask them to use Explain Everything they will know exactly what to do, and this was a perfect way to get to know my new students!


Friday, August 8, 2014

Chromebook Training Week

Photo via us.acer.com
If you've read any of my recent blog posts, you'll know my district will have 1:1 Chromebooks (Acer C720P's) for grades 7 through 11 this coming school year.  To prepare the teachers for this new adventure, we were given the opportunity to participate in four days of Chromebook training, with teachers from our district leading the sessions.  Whenever I attend a workshop or conference, I like to reflect on what I have learned, and I'm happy when I can walk away with having learned one new valuable idea.  The purpose of this post is to do just that, and share my favorites with you, my readers.


All attendees met in a large group for each day's opening session, then we broke out into individual sessions based on experience and interest.  After our lunch break, we met with our content area colleagues to discuss how we can apply our new technology to our curriculum.  We ended the day back in the large group to answer any questions from the day.  Here's the overview of each of the days' sessions I attended and what I feel was the best thing I learned on each day.


Day 1
Photo via www.bettshow.com
The sessions I attended on day 1 included Hapara, Google Add-ons, and Best Practices for Google Docs.  I'm really intrigued by Hapara and I'm excited to be able to try it out with my new group of students in September.  For those of you who aren't familiar with Hapara, it's a Google Apps for Education add-on that consists of two components, Teacher Dashboard and Remote ControlTeacher Dashboard allows for workflow management and monitoring of students' activity.  Remote Control gives teachers the power to remotely open or close tabs on students' Chromebooks as needed.  With the new Google Classroom being release August 11th, just in time for the new school year, it will be interesting to see if it can be a replacement for the Teacher Dashboard portion of Hapara or if they will just work well together.  I plan on comparing the capabilities of the two applications by using Classroom with one of my Pre-Algebra classes, and Teacher Dashboard with my other Pre-Algebra class.  I still plan on using Remote Control for both classes since Classroom does not have that functionality (yet).


Day 2
Photo via techsmith.com
On day 2, I attended a session on Flubaroo, another on Socrative, and one of screencasting with TechSmith's Snagit and Movenote.  I was already familiar with the first two applications, but Snagit is what caught my attention on this day.  I have been using the iPad app Explain Everything to make videos for my students (and for my students to make their own videos as well).  While I absolutely love Explain Everything, sometimes I need to do a screencast of something on the Chromebooks, so Snagit will be my go-to app for this purpose.


Day 3
My "Do Now" mini-NPP
Day 3 was all about tools for our content areas (math for me), differentiation, and sharing learning.  My math team worked with Nearpod.  Since I had experience with it, I demonstrated how to use it.  I had the other teachers take the student role so they could see how it will look to our students.  They absolutely loved the "Draw It" feature, especially since our Chromebooks are touch screen!  I shared my favorite stylus with them (TruGlide) and one of my team jumped onto Amazon right away to order one!
Photo via lynktec.com
 After I showed them how to create a quick Nearpod Presentation (NPP), we brainstormed how to use "mini-NPP"s for our "Do Now"s, homework checks, and even exit tickets (thank you to Cathy Yenca for that great idea!).  I have used Nearpod for full presentations in the past, but never for these shorter snapshots of learning.  What made us decide to use Nearpod over some of the other tools we tried was the "Draw It" feature and the fact that we can save the data from each session.  We also liked InfuseLearning, except that we couldn't use the draw feature during a pre-made quiz.


Day 4
Photo via blogger.com
On the final day, I attended sessions on backchanneling, Google Sites and Google groups, and blogging.  We played around with TodaysMeet for backchanneling, which had my wheels spinning trying to figure out how I could use this tool in my math classes.  (Any ideas? Please let me know!)  But the most exciting idea I took away from this day was having my students using Blogger for their math journaling.  I had set up a Google Sites with the announcement style pages for my students to blog and keep all their blogs connected under one site to make it easier to monitor all of them.  But during the blogging session I found out that Hapara will monitor my students' posts and comments as long as they use Blogger as their blogging tool.  This is definitely the way I will go.  Now I just have to plan a digital citizenship/how to blog lesson.  I'm excited to try this new way to improve my students' writing about math.


On the last day of training, everyone who didn't already have a Twitter account signed up for one.  Eisenhower Middle School and Roxbury High School teachers will be busy tweeting now!  All-in-all, the week of Chromebook training was terrific!  I found a new tool to experiment with during each of the four days.  As much as I am enjoying my last few weeks of summer break, I look forward to my new "Tech Adventures in a Middle School Math Class" in September!

Wednesday, July 23, 2014

Fraction Review with ThingLink

At the beginning of every school year, I spend several weeks reviewing basic math concepts like fractions with my students to recover from the summer slide. With so many new concepts to teach during the year, I really hate to waste so much time on fractions, a concept they have learned and reviewed for many years in a row. There's never enough time to teach my students all of the 8th grade Common Core Standards that they need to learn before state testing. 

This year, since my students will have 1:1 Chromebooks, I'm planning on trying something new. I created this ThingLink as a way for the students to review the fraction topics at their own pace. I purchased enough pairs of earbuds from the dollar store, in case someone doesn't have their own, so they can listen to the videos I made with Explain Everything that are linked in the ThingLink.


There are 4 numbered sections for the students to move through, "Equivalent Fractions", "Fraction Operations", "Mixed Numbers", and "Fractions & Decimals". In each section is a video (or two) to watch. Then I will have some practice problems for them to work through, which I will use as a formative assessment to see if they are understanding on their own. If they are still struggling, I will be able to give them one-on-one or small group instruction to go along with the video instruction. Once they feel they have mastered the topic, they can click on the link to take a quiz which I created in ThatQuiz. (This is not the actual ThingLink I will use with my students. I have another copy of it which has different links to the ThatQuiz quizzes that my students must sign in before they can take. This one has practice quizzes only so you can try them out.)

Since this is self-paced, I anticipate a few students will finish before the rest of the class. I will have some extension activities, possibly word problems, for them to complete. Stay tuned... I'll let you know how this independent learning works out!

I updated my ThingLink on 7/26/14 for the #TLChallenge. This week's theme was "Turn It Up a Notch with Sound". Our challenge was to use Audioboo to add sound to our ThingLink and incorporate UDL (Universal Design for Learning - check out this video for more info on UDL). I used the Audioboo sound clips to read the directions in each section to my special education students who might have difficulty reading them on their own.

Sunday, July 20, 2014

ThingLink Challenge Week 6


The ThingLink Challenge this summer has been so much help to me in becoming more adept at creating and applying ThingLinks. (Click here to read my last post about the ThingLink Challenge and how to join us!)

We are in week 6 of the challenge now. There are so many great ideas coming from all the teachers involved. Visit our showcase to get some great ideas for yourself. Susan Oxnevad (@soxnevad) even had a Twitter chat about ThingLink this past Thursday which was amazing! (Search for the #1to1ipadchat to find our tweets.)

What I have found very useful is learning that we can embed our ThingLinks into Padlet walls. I have used ThingLink and Padlet separately in the past, but combining them is a perfect blend of technologies, and so easy to do!

Here is my week 6 submission. The theme for this week was "ThingLink Unplugged". We were to create a ThingLink with the ThingLink mobile app to demonstrate how we can create ThingLinks without the internet, then upload them to the web when we return to an internet connection. This could be used during a class field trip, or just an indoor or outdoor excursion around the school. Soooo many possibilities my head is spinning!  What would you do with ThingLink?

Sunday, June 15, 2014

ThingLink Teacher Challenge


Susan Oxnevad (@soxnevad) has organized the "ThingLink Teacher Challenge 2014". (Touch the image above to see the "nubbins" appear. Then touch each one to discover information about ThingLink and how to join the challenge.) This is a great opportunity for teachers to learn how to create and use ThingLink in their classrooms. Teachers and students can create interactive images that connect to either text, a photo, a video, or a link to a website. (Click here to read "
3 Reasons to Take the ThingLink Teacher Challenge This Summer".)

Here is my Week 1 Challenge entry:


It's not too late to join!  Click here to be brought to the sign up form.

Next week's challenge is to "design your digital self" -- I can't wait to create this one!


Thanks Susan for organizing this fun summer professional development!


To see all of the participants' entries, flip through the slide show below:


Friday, June 6, 2014

Mathtechy's Book Club

I am running a summer book club for some technology PD! We will be
www.ascd.org
discussing "Using Technology with Classroom Instruction that Works". Check out 
http://mathtechysbookclub.blogspot.com/ for the details. Hope you'll join us -- the more the merrier!

Saturday, May 17, 2014

Chromebooks 101

Welcome to our fifth and final installment of Teacher Training Bootcamp. This week, we are all blogging about our elective topic. I chose Chromebooks as my elective. I'm happy to report that I have passed all of the tests required and I am now a "Certified Google Educator"!


At our administrative PLC meeting this week, we were given our new Chromebooks! Ours have a touch screen -- it's like a combination of a laptop and an iPad!  Next year, our 7th through 10th graders will have 1:1 Chromebooks, so the staff was given the Chromebooks early to familiarize ourselves with them and plan for integrating them into lessons for next year.


Chromebooks run on their own operating system: Chrome OS. If you're familiar with using the Chrome browser, then using a Chromebook should be a fairly easy transition. Chromebooks have several advantages:

  • fast start-up time (about 7-8 seconds!)
  • long battery life (5-9 hours)
  • outstanding virus protection
  • Google Apps for Education built-in
  • great for collaboration
  • portability (access your files, bookmarks, apps, and extensions from any device by signing into your Google account)
  • offline access (if necessary)

For those of you who are new to Chromebooks, here is some basic information to get you started on your Chromebook adventure:

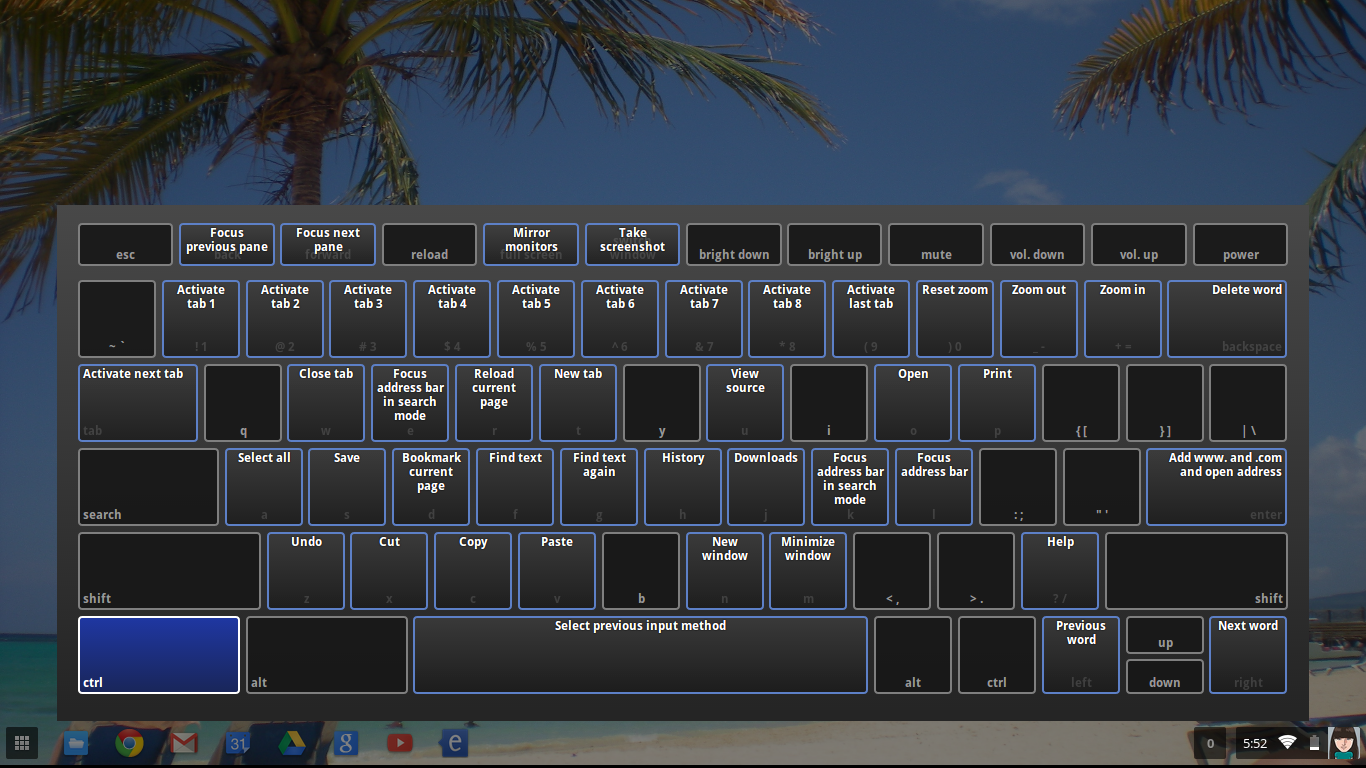
There are many keyboard shortcuts to make your life easier. If you hold down the ctrl + alt + ? keys, it will bring up a color-coded interactive keyboard display. Once in this display, if you hold down the either the ctrl, alt, shift, or search key it will highlight the keyboard shortcuts you can access with that key. (Note: there is no "caps lock" button on a Chromebook -- use the Alt + Search key (looks like a magnifying glass) instead. There also is no "delete" key -- use the "backspace" key instead.)


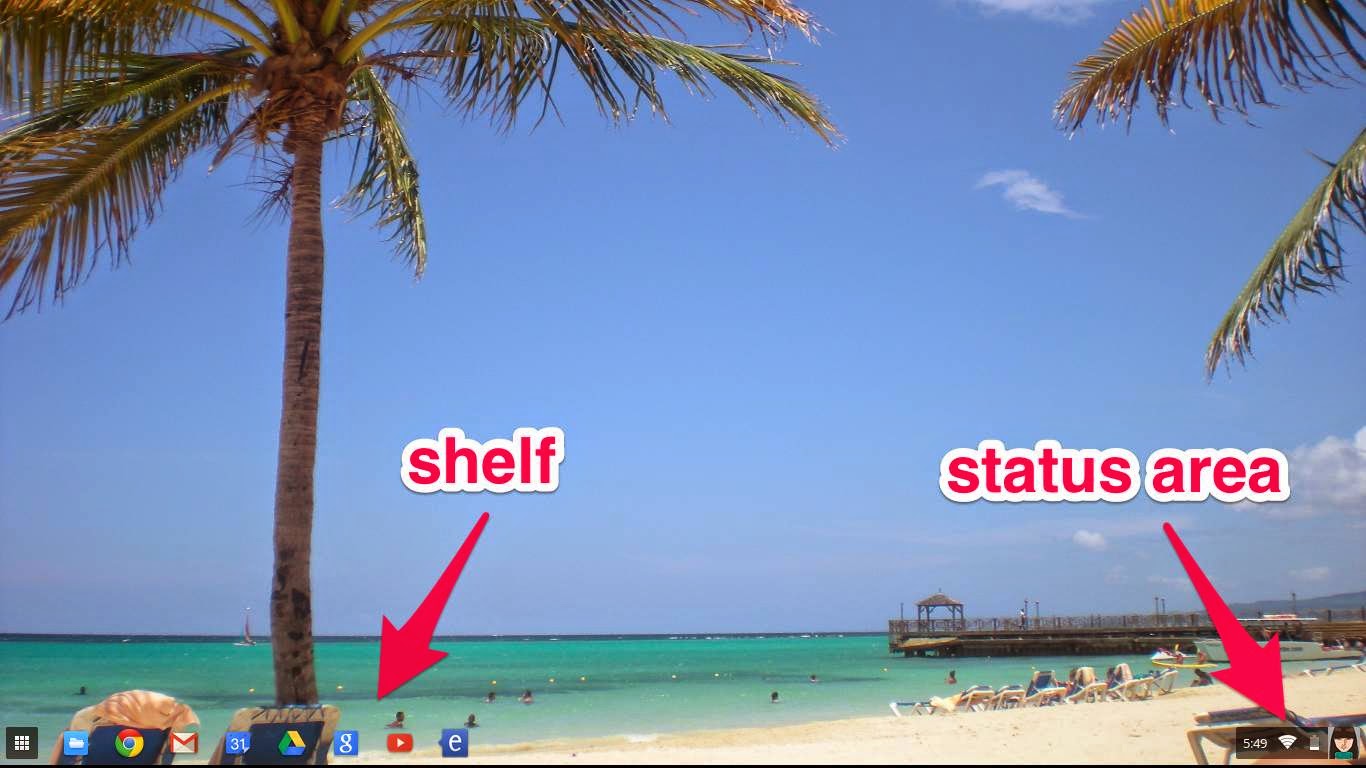
On the desktop, you will have your "shelf" at the bottom left, and the "status area" on the bottom right. You can choose to keep your shelf hidden until you need it or keep it viewable all the time by tapping on the shelf area with two fingers (or alt + click) and either checking or unchecking the "Autohide shelf" option. (The shelf is basically the same thing as the "dock" on Apple devices.)


The shelf will have an icon for launching the apps list (3x3 little white boxes) and the Chrome browser. You can add any other apps you'd like by "pinning them" to the shelf. You can do this by first finding the app you want to pin in the apps list (click on the 3x3 little white boxes). Alt + click on the desired app and click on "Pin to shelf". Pinning an app to the shelf makes it quicker and easier to access.

The status area has important information about your Chromebook. Before you even click on the status area, you can see if you have any notifications, the time, wi-fi connection, battery life, and user icon. If you click on the status area you can see which user account is signed in, and sign out if you're ready to do that. You can manage your network connection, access bluetooth and volume controls, and access your settings. The date is displayed, and next to the date is a question mark to access the help menu. You can also shut down or lock your Chromebook from the bottom of the status area menu. If you lock your screen, you will be required to enter your account password to unlock it. You can have it require a password to wake it up from sleep mode for added security. You can also lock your screen by pressing the power key (on the top right) briefly until the sign in screen shows up. To shutdown your Chromebook, either hold down on the power key until it turns off, or click on shutdown in the status area.

With Chromebooks you won't be able to access your old friends in the Microsoft Office Suite (Word, Excel, Power Point), but you will make new friends in Google Drive (Docs, Sheets, and Slides). The beauty of this is that you never have to pay for this productivity software and you don't have to worry about updates. This is all taken care of by Google in the cloud. And your files will be accessible from whatever device you use. In Drive, you can view a Word doc or convert it to Docs. (Warning: tables do not play well! They lose their formatting.) My advice would be to just store the Word doc in Drive and/or view it, but don't convert. Going forward, create all new documents in Docs.

So, let's get back to the apps list (the 3x3 little white boxes). When you click on the apps list, you will see all the apps you have installed on your Chromebook from the Chrome Web Store. If you have more than 16 apps, you will need to use the scroll bars at the bottom to move to the next page of apps. You can rearrange apps or move them to a different page by dragging them to where you want them. 

What's the difference between an app and an extension you ask? Well, an app is an application that runs in the browser (basically a website). An extension adds functionality to your browser. When you add an extension, you will usually see a small icon appear next to the address bar. Most extensions add their functionality to every website you use. Apps don't affect or interact with other apps. Some types of things extensions can do are blocking YouTube ads, the Google Dictionary which allows you to click on a word to have it defined and pronounced, creating QR codes or shortening the current URL, decluttering web pages to make them easier to read, text-to-speech, Gmail checker, split screen, or screen capture. There are so many apps and extensions to explore. Some are free and some you will need to purchase. Some are written by Google and some are written by independent developers. So go to the Chrome Web Store and do some shopping!

I hope this has helped you become a little more familiar with your new Chromebook. Be sure to check out the other topics that my fellow bloggers have written my clicking on their buttons below.


Thursday, April 24, 2014

"No-tech, high-tech" Plickers

This is the last week before the NJ ASK. It's very frustrating because there's still almost two months left of school so I haven't taught my students everything they need to know as eighth graders yet, but they will be tested on all of it next week. This week I've been trying to expose them to as much as possible of the curriculum that they haven't learned yet so they have a fighting chance...

Today's topic was transformations. I gave them a quick overview of translations, reflections, rotations, and dilations, how to plot an image of the original figure given the transformation, and how to determine what the transformation was given an original figure and the image.

So far, the lessons this week have been very dry and boring because I've been flying through the topics and haven't had time for any creative or fun activities. Today, I decided to change it up a little. 
I normally avoid giving my students multiple choice questions because I feel like all they do is guess and don't bother to actually work out the problem. (I don't like making up multiple choice questions either -- I'm not good at making up the wrong answer choices!) A few weeks ago I showed Plickers to the teachers in my professional development class and they thought it was pretty cool, so I wanted to try it with my students. I needed multiple choice questions in order to use Plickers so I went on Problem-Attic and curated 20 multiple choice questions related to transformations.

I explained to the class that we were going to try something new, "Plickers", and described them as "no-tech, high-tech". They were familiar with the clicker concept, so I said it's like using clickers, but it's just a piece of paper with a big, fat QR code. For the first few questions, I Reflected my phone up on the Smart Board so they could see the "high-tech" part. They were very impressed! (I think they really just liked seeing their classmates' goofy faces as I scanned past them to capture their responses!) 

I received nothing but positive feedback about using the Plickers from my students. Even the aides in my classroom thought they were really cool! The students appreciated the fact that it allowed them to change their answer if necessary. Some of the other assessment tools we have used this year would not allow this, informing them that they had already submitted their answer. The only issue I had was that occasionally when I tried to scan a student's Plicker, it would flop over because I only printed them on paper. I tried to print them on cardstock this morning, but the printer kept jamming, so I finally gave up and just printed on paper. I have to work on this before I use the Plickers again...

Sunday, April 13, 2014

Creating & Using Google Forms

Welcome to our third installment of Teacher Training Bootcamp: Google Docs & Drive. 

Google Forms is a special feature of Google Sheets (spreadsheets). It has so many uses: 


  • surveys of students, parents, or faculty
  • assessments of students (or teachers)
  • a way to enter rubric data
  • for peer editing feedback
  • assignment submission
  • applications for clubs
  • just about anything you need to collect data for

How To Create a Google Form:

Forms are super easy and quick to create! Here's what you need to do to create a basic form:


Go to your Google Drive, click on "Create", then choose "Form".


Give your form a name and choose the theme you want to use (this is just one of the many places where you have the opportunity to name your form). 


If you are a Google Apps for Education school, in the "Form Settings" section you will have the option to require the user to login to your domain. (I don't usually check this because students are accessing my forms on iPads and aren't signing into Google. You would also not want to use this option if you were sending the form to someone out of your domain.)


In the next section, you enter your question in the "Question Title" box. Click on the pull down arrow next to "Multiple choice" if you want to change the type of question. Underneath that you can enter the choices the user will be presented with. You can make it mandatory to answer this question by checking off the "Required question" box. When you are done editing that question, click "Done". Click on "Add item" to add another question.


In the last section, you set options for the confirmation page. You can allow the user to submit another response, allow them to see the results of the form, and/or allow them to go back and edit their responses.

When your form is complete, you can click on "View live form" to see what your form will look like to the users. If you are happy with the way it looks and are ready to send it to your users, click on "Send form". You will be given several options for sharing your form: you can copy the URL, send it via Google+, Facebook or Twitter, grab the embed code to put it on your website, or email it. Click "Done" to share it.


I like to copy the URL and create a QR code for the students to scan to bring them to my form -- makes the process super easy!

By default, your responses will be collected in a spreadsheet with the same name as your form. While in this spreadsheet, if you click on "Form" at the top and "Show summary of responses", you will get a nice visual summary of the data you have collected.


Interesting Uses for Google Forms:

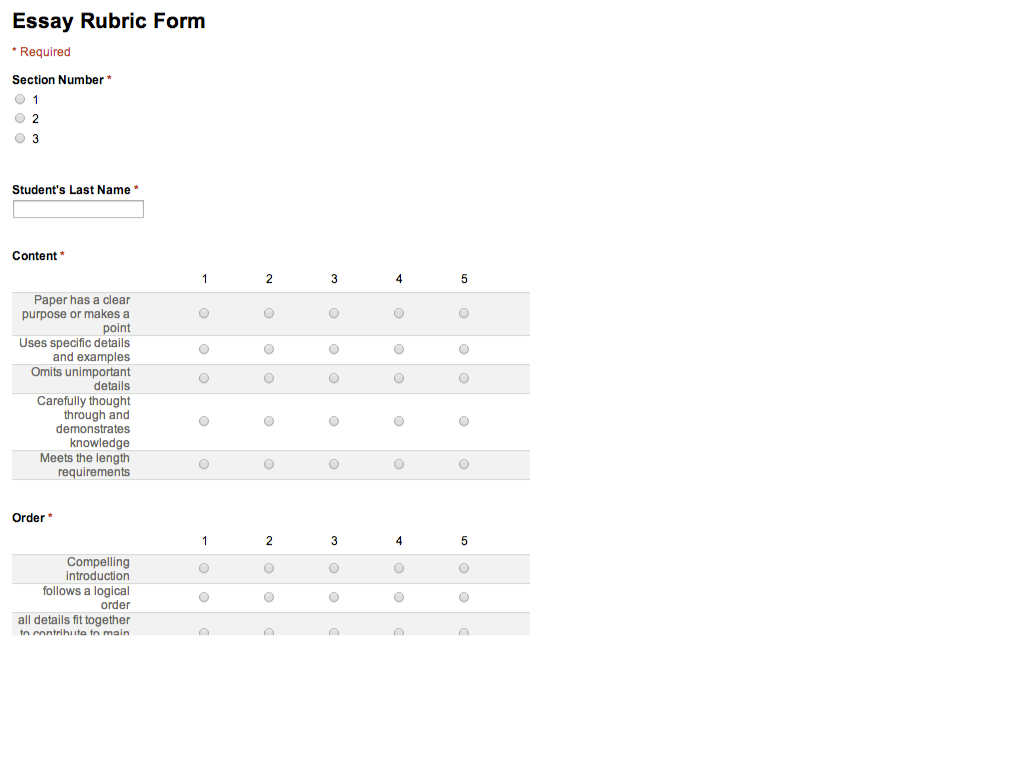
Kevin Brookhouser uses forms in a really unique way - he set up a form that he could enter the rubric data for a writing assignment. You can search for his template in the public templates. Click on the image of his form to see his video on how to create and use it.


Matt Vaudrey created a report card for himself with Google forms and had his students evaluate him. Check it out here: http://mrvaudrey.com/students/teacher-report-card/

I have used a Google Form to have the students provide me with feedback on their understanding of the current topic we're working on, and about half way through the school year I've surveyed them on what their favorite projects were so far so I can try to do similar types of projects again in the second half of the year. I'm thinking of using Google Forms to collect data from parents at Back-to-School Night next year instead of writing their information on the sign-in sheet. 

Check out Graham Attwell's presentation for more great Forms ideas: